 |
| Christmas 2017 Crown Point and Beacon Rock Columbia River Gorge |
Monday, December 25, 2017
Merry Christmas and Happy New Year!
Wishing you and yours all the best in this holiday season, and the best year ever in 2018!
Wednesday, November 8, 2017
Paintings, a party, and friends

'A Bigger Gorge' is all installed! Had a great time celebrating with many friends. Word is that it's been very well received by the tenants, and the building owner did a fantastic job of hanging it—which took him four hours using near-zero-tolerance theft-proof brackets. Hopefully, it'll be there for a long time. You can see it in The Gotham Building in North Portland, at the Page Street entrance, 722 N. Page Street. Have a cuppa at the Little Gotham Coffee Shop, right there!
Thanks to all my friends for their support and encouragement that helped me get there, and of course to the Hilderbrands!
Cheers!
Friday, October 20, 2017
Why cell phone cameras are a good thing
 |
| Underwood Fire, 7:14AM |
The fire was about an hour and a half old at this point, and I was definitely anxious as we watched a new, big flare-up about every 3 minutes for far too long, as the packing plant fruit boxes and parts of the pear shed caught fire, one after another. We got on the radio and found that our guess from looking at maps was correct. I really felt helpless watching the destruction continue, wondering if it could possibly jump to the trees and head toward us. When I heard they had six engine companies on it and more were on the way, I relaxed a little. About an hour later, they had all the flames out, leaving a smoldering, smoking ruin.
Another blue and orange painting! (With a little teeny tiny bit of yellow.)
Tuesday, October 3, 2017
5,184 square inches of painting
 |
| A Bigger Gorge |
I certainly do still want to paint a lot more pictures of the gorge, try different painting styles, different colors, and also different seasons, different angles and lighting, like doing more portraits of the same person; try to capture more moods, more facets of their personality. But I need to switch to other subjects for a while. A lot of other things are starting to pile up in my head and I need to get them out.
The most difficult aspects were all related to it being so big, and painting it in such a flat, semi-abstract style, minimizing texture in favor of colors. As I was working out the final selection of hues and values in the river and foreground, I decided to keep them simple, not to let them pull the eye away from the predominant focus on the far end of the river and the hills around it. I spent several days thinking that choice through and decided it was the right one for this work.
The PBS series American Masters profiled Tyrus Wong last weekend, whose landscapes combine traditional Chinese themes mixed with a simplified style and non-traditional colors. They quoted him as saying that large amounts of detail are childish, and what the painting should show is the painter's enthusiasm for the scene. I found his paintings dramatic, evocative, and very beautiful, and that coupled with my decades of admiration for the works of Georgia O'Keeffe helped me settle on simplicity. I'm not saying it's the right approach for everyone, or for every subject, but when it works, it's great.
The only real surprise was that it took about three times more paint than I thought it would. I'm really glad I tackled it. My greatest fear was that I was going to damage one of the panels carrying it back and forth to the living room for photos, and when I accidentally brushed them with my shoe just walking around the studio. So far they're all in good shape. I just have to glaze them now—I did buy an extra jar of glaze—and that will take several days for all of them. I would varnish them except I have no experience with varnish, and I'm not using these for guinea pigs.
Thursday, September 14, 2017
What a difference the brush makes

I finally got all the hills looking pretty much the way I want them to, and moved into the finishing touches stage on all three panels, and for the last week I've been working on the clouds. I saw two problems with them, the first being that the clouds in #3 really didn't add anything to the composition. Panel #3, the right-most end, isn't the focal center of the painting anyway, but I didn't want it to be just an add-on, I needed it to have something in it that would catch the eye and be interesting to look at. Otherwise, why have it? Since the cloud area is where I have the most freedom to improvise, I decided to add an interesting cloud pattern that would draw the eye out all the way to the edge if one happened to be looking at that side of the painting.
Once I got that roughed in I went through all the panels, adding more color detail in the clouds—more colors, more combining colors by glazing the predominant tones by layering each over the others—purple over orange, yellow over orange, and orange over purple and yellow. This doesn't really show up in the photo, but in person it makes the colors look richer and a lot more varied. You can paint in subtle color shifts with a thin glaze that support the 3-D look of shapes. I was using my large flat and bright brushes, a couple different kinds but all with synthetic hairs. The ones I used are fairly soft as brushes go, but I couldn't keep from getting the paint on unevenly and leaving more surface texture than I really wanted in the finer areas. I was getting more frustrated by that because I knew I've gotten a smoother look in many previous paintings, and that's what I want in this painting—a minimum of visible brushstrokes and a maximum of smooth shapes and edges.
Then a few days ago without thinking why, I picked up a different brush, a large filbert Winsor & Newton Eclipse series, which is made of fitch hair, or "black sable". I have a few of them I bought years ago, they're actually for oils, but they work great with acrylics and I've used small ones in a number of landscapes to paint leaves. As soon as I started painting with it I knew this was the answer I was looking for. Fitch hairs are so much softer than synthetic fibers, I can make beautiful unbroken, consistent washes of even thinned-out paint, and because they hold so much paint it's easy to get a nice smooth edge line, or a more smoothly-graded wash. In addition, the softness makes it easier to work wet-over-damp without disturbing the layer beneath, which saves a lot of standing around and thumb-twiddling waiting for a brushstroke to dry.
I looked over the web to see if I could find an even bigger Winsor & Newton fitch brush, and probably because they come from real animals they're quite pricey, not as bad as sable but way more expensive than the White Wonder or Softgrip brushes I use a lot of. I also found none of the big discount sellers even have the #14 I have, and W & N themselves were out of stock on anything that big or bigger. So I looked on Blick again and they do have their own line of fitches, including larger brushes, at a considerable savings over the W & N ones.
Saturday, September 2, 2017
Figuring out what the painting wants

I finally got the color I want on the last big hill. It took me three tries over three days. My first guess was too dark and I thought it was too blue. The second time I made it lighter and more gray, and that looked good value-wise, but the color just looked like it didn't fit. I puzzled over it last night, and finally decided to take it back to blue, but a warmer blue, almost matching the rear hill on the left side, so mostly pthalo, with a smaller fraction of cobalt. The other thing I did with this pass was reduce the range of values, giving it more aerial perspective by lowering contrast.
I think the reason it took me so long to get a color that looked good was, again, because I'm really inventing these colors—they only resemble the colors in the photo references I have; and those photos, which were taken in different seasons even, as well as different times of day, are all different from each other. It was too big of a leap for my brain to consolidate all that varied information in one pass—I had to circle around it for a while before I realized I was trying too hard to copy the colors from the photos instead of doing what the painting needs. Last night after I finally marked up a photo with these colors, I saw the symmetry I got by having the rear hills on both sides being almost the same hues.
The white lines are there because you can't cover up blue with Pyrole Orange without a LOT of impasto.
If I still like it tomorrow, then I'm done with the hills. Or mostly done. 😊
Almost 92º outside at 3:30pm. At least we had a nice cool night last night.
Friday, August 25, 2017
Working out the level of detail

I think the left-most (north side) hills are 95% done. Earlier in the week I started painting in the deciduous trees at the base of the middle hill, and took it to a level of detail that really seemed too much for the rest of the painting. I was afraid the overall scene would get lost in that much detail. I know that's the opposite of my main worry when I started (would there be enough detail to be interesting), but there you go. Anyway, I simplified it and darkened it, and I'm stopping work on that section for now. I may refine it more later...or not. I may end up wanting to put a lot more drama in the clouds.
Last night I roughed in the foreground across all three panels, so today I'm starting the 2nd pass on the south side hills. Only five weeks left to finish it!
Monday, August 14, 2017
Connecting the audience to the painting
 |
| The Upper Pond |
So I leaned back in my chair, listened to the band, and just pretended it was a forced vacation, and the only thing I could do was relax. In a little while people started walking around, and a few times an hour someone would come over and talk for a minute.
I did have a great time, despite not being able to paint there. I finished it up yesterday in the studio, thinking about the things people had said to me about it. Almost everyone who commented on this one of the upper pond with the property and the cabana behind it, said they loved the blue. One teenage girl said it was her favorite painting there, and that I "got the blue perfectly". I found that interesting because I had deliberately intensified the blue of the water and the sky, using pure Ultramarine blue with white to lighten it. The actual colors of the water and sky that day weren't anything like a match for my painting, they were both a warm azure blue, part cobalt and part cyan. So I think what she meant was that it matched something in her memories or her imagination. I was fine with painting the plants and the cabana their natural colors, and the same for the mimosa tree, but I really wanted the blue and yellow to go beyond what anyone would call natural.
Maybe the way to use color to connect to people is to connect to their imaginations, not to the natural colors of the landscape.
No more small paintings till after I get A Bigger Gorge finished, but this was a really useful exercise.
Tuesday, August 8, 2017
Art In The Garden at Villa Catalana Cellars this Saturday
 |
| The Lower Pond |
Monday, August 7, 2017
Discovering a new love of painting

I'm trying to figure out why I'm enjoying working big so much. I've noticed that I'm not worrying about the outcome anywhere near as much as I used to. I think the sketching helped with that, but it also occurs to me that having to work with something so much bigger than I am, where I can only fit a small portion of it at a time in my field of view, maybe I have to trust that what I'm doing is going to fit in.
It's only about 30% done, time-wise, but it's going in the right direction. I've got almost all the shapes defined. I just want a little more shape definition on the north side (left side.)
I think there's something else going on that may be more personal—probably everyone wouldn't feel this way, but when I load up my big brush and step up to the canvas and apply the paint with a big stroke, it just feels like the most natural thing on earth. It feels like I've been doing it for centuries, and I'll keep doing it as long as I possibly can. It's not like I'm any good at it yet—I'm still doing a lot of repainting. But it feels like I've finally—finally—found something that totally belongs to me, and it's not a thing—it's a movement, it's a dance with color and form. It's even better than having a really good gardening day. It's like being myself in the most clear and unfettered way I know.
I love how it fills my visual space with color while I'm working on it—I really do like being surrounded by colors. But now that it's looking more like actual landforms, it's almost like looking out a big picture window at something 'real'. Glazing over this underpainting is what I'll be doing for the next several weeks.
Monday, July 31, 2017
Almost to the fun part

I've been making slow progress on the painting, and have almost finished the underpainting. After getting the more detailed photos I wanted, I'm tweaking the shapes of the bluffs on both sides of the river—and taking a lot more time than I thought I would need to do it. But I've started putting in some shape details and playing with colors a little on both the land and the clouds, which is fun doing this big.
I finally rearranged the easel setup so I can see the tv in my studio while I paint. I'm so used to watching dvds or streaming while I'm painting, I was really missing it.
It's going to be really hot here for the next week and a half, to hot to do anything outside besides water, so I should get a lot done.
Tuesday, July 25, 2017
I need more paint

Three and a half days of work later, I'm still working on the underpainting. I emptied another partial tube of paint—my cobalt green. I had just placed another order with Blick two days before, so I had to switch to a different green, permanent green light, and adjust the mix appropriately so it's good enough for now. I really underestimated how much additional paint I would need for this. And this is just the underpainting! Who knows how much more I'll need for the glazing!
Other than that, it's going well. I'm getting more detailed photos of the hills to work with, and once those get drawn in, I'll be able to start playing with more hues and layers of glazing.
I would say at this point that being able to work across two canvases at once is pretty much a requirement, for efficiency if nothing else, and especially when you have a design that requires continuity of line across those seams.
Wednesday, July 19, 2017
The whole three yards

I was sitting in the living room staring unconsciously at my sofa when I realized that its length and poufy cushion makes it possible for me line up the canvases out here so I can see them all together, and from more than three feet away. The only way I can see them lined up in the studio is to stand to one side and use a fresnel lens:

Obviously not a great solution.
So! On we go. For the first two days I couldn't help spending time saying to myself, "What was I thinking?", even as it was taking shape. I would stand looking at just two panels together and think, that is huge! But being right up there next to it, with those intense colors filling my field of view, mixing big globs of paint and brushing it on with large, bold strokes—it feels great!
I have to take my 40% coupon to Michael's this morning and get more purple and diarylide yellow paint, but right now I'm just excited to see it all together. And, very, very happy that I can see it all together.
Monday, July 17, 2017
Making room for a big canvas

The first day of work on the painting I put each canvas up on my regular easel one at a time and blocked in the top band of purple. When I finished that and lined them up, I saw that even with the drawing, there was a big difference on the sides of the #1-#2 seam. I knew then that I really needed to work on two at a time.
So today I moved my regular easel out to the garage and brought the rack back in, and set it up in the studio in the only place there's room. I set up a table on either side, and used the counter behind me to hold everything else.
Once I got a workable setup and started putting on the paint, it became fun. I'm really going through paint as I block in the basic shapes. I wish I could put all three up, but there just isn't enough room, in my 13'x15' converted-garage hobby room/studio.
Friday, July 14, 2017
A Bigger Gorge

I'm following in the steps of David Hockney and Robert Burridge and taking on my first ever multiple-canvas painting—and it's a big one. A triptych 4' high by 9' wide—three 36x48 canvases. I've done singles that size, even a 36x60 once, but this is a whole new level of largeness for me. It's going to make this studio feel pretty small, I'm thinking.
The design that my client chose is my little gorge sunrise sketch I did in May:

Since the design has so many lines that continue across two of the canvases, I have to have some way to line up at least two at a time for the drawing, the color matching, and the finishing touches—hmmm, that's about 80% of the painting time—so I'll be pressing my folding show rack into service. I was very happy to find out that it's plenty big enough to hold two.

I'll be blogging this all the way to its hang-up in a North Portland office building! I'm guessing it'll take me 2-3 months to finish. I think the biggest challenge is going to be to create enough texture and color detail to make it interesting at that size when the design is so simple. That may not be a problem at all, but it's the thing I'm most concerned about right now. Well, that and getting around in my studio while it's in here. I had to do some clean-up, some clear-out, and move one chair out to the garage, but that's not bad. I've always wanted to paint big, so here's my chance to find out if I do like it!
And when I'm done, it'll be Autumn!
Monday, July 10, 2017
An affordable display that fits in my Corolla
 |
| Cheap, portable display system |
I went to Home Depot and bought a roll of vinyl pipe hanging strap, and cut lengths to fit from bolt to bolt with the legs out as far as they go. I used a hole punch to cut bigger holes for the bolts. Because of the thickness of the vinyl, I had to use a bench vise to squeeze the hole punch, but that worked. With the crosspieces tight and the legs spread as far as possible, the vinyl strap keeps the paintings from turning inside.
For quick setup and teardown, I leave the vinyl strap and bolts on, take out the top bolt, and use cheap velcro ties ($7 for 100 on Amazon) to tie the legs together. They take up almost no room in the car (if you don't have anyone in the passenger seat), running from the front foot well back over the seat into the back, and each one weighs very little.
I must say that these are really cheap easels with tiny screw eyes for the chain—they will not withstand rough handling, and might not hold really heavy paintings on the crosspieces. I set up four, two pair back-to-back, using the same velcro ties to (a) tie the back-to-back pair at the center joint of the back legs, and (b) to tie the hanging wire on each top painting to one easel leg. For extra wind-proofing, I hung full gallon water jugs from the crossed rear legs of each back-to-back pair. They didn't move at all and once I got the paintings level, they stayed that way. Now they're all together out in the garage, taking up very little room, all ready for the next time I need them.
As you can see, there's a size limit for the lower paintings, these are 12x16 frames. But if you bolted on a longer, sturdy crosspiece instead of the strapping, that stuck out past the legs, you could hang larger paintings from that.
p.s. — Lewisia sold, and Memaloose Island as well!
Wednesday, June 28, 2017
A June flower patch
 |
| Flower Patch |
I blocked in the background and foliage colors first. After that I started brushing in details of the different foliage types and colors. When I had their shapes in, I blocked in the dark shades of the flowers. Because of the darker background, it took several layers of paint to build up the lighter colors.
The many different foliage shapes and textures required a few different brushes and more detail than I've been doing, but those different shapes and hues are the substance of this painting, and I was hoping to make a few of the plants recognizable to gardeners—feverfew, foxglove, roses and California poppies. The mop in the upper left is supposed to be asparagus.
I was surprised by the amount of depth that appeared; maybe it's from the darker-than-necessary shadows in the background.
Saturday, June 17, 2017
184 Lewisias...give or take a few
 |
| Lewisia |
I figured patience would make or break the painting, and started out with a charcoal drawing, settling on clumps of flowers, and cutting down to about 160 flowers to start with, from the maybe 250 in the photograph. I found first that there were hues of orange, red, yellow, magenta, and deep red-violet in the flowers, and greens that ranged from light yellow-green to deep emerald and turquoise-green. I started by blocking in the flowers in shades of peach as a base, knowing it would take many, many layers to capture all the colors. I had no plans to paint every petal on every flower, and saved that for a sprinkling of large ones around the upper right where the brightest were. Everybody else got just a suggestion of their many hues. There was not one flower that showed only one hue.
As soon as I started working on the leaves, I knew I wanted a live model, so I called Wild Ginger and asked if I could come pick one up. I wanted to get a good sense of the thickness and curves of the leaves and how they reflect the light—they were too much obscured in the photo for me to get a good feel for them—and also I was by then insanely jealous of my neighbor's success and had to try growing one—no, two—of my own. I don't care if I have to wait six years, I want one like this!
After that I alternated a day on the flowers, then a day on the leaves, building up layers of hues and picking what to emphasize and what to dress down, trying to build a center of focus in the upper right. Yesterday, after six days, it was ready to start the finishing touches, when I realized I needed to darken and violet-ize everything on the left side, but my glaze was too thick and they all went from semi-defined flowers to undifferentiated blobs. ARGHHH! Fortunately I still had all my different hue mixes and it only took a couple hours to repaint them all. Some dark blue-violets in the darkest shadows made the highlights pop, and the yellow centers in every open flower made them look more defined than they are. The orange hue in the cement surface in the lower right woke up the turquoise upper left and helped fill out the color scheme.
Thursday, June 8, 2017
New, cool colors

I was wanting to get away from the blues and oranges I've been working with for many weeks. I started out with a triad of red-violet, blue-green, and yellow-orange, but when I had developed the rough composition, that combination looked too intense and unrealistic. I took one color at a time and began graying them and lightening them. In the process I added violet flowers and more greens to the bouquet, and created a green-dominant background, with just a few touches of the original red-violet. I ended up with an unbalanced color harmony, from pale yellow-orange through yellow, greens, grayed teal, and all the violets. No blue, orange, or red.
I also started out with a clearly defined table top, but wasn't happy with the starkness of that composition. On a whim I turned that into what could be an unfocused garden scene, backlit and pushing into the foreground, with just enough level surface to anchor the vase and its shadow.
In the end, all the layers of colors first tried and then rejected remain in small bits within and around the edges of the color masses, where I think they add depth and a kaleidoscope of small relationships with the colors that replaced them—violet over blue-green in the bouquet, and blue-green over red-violet in the lower half of the surround.
I did have fun with the vase. Part of me would have liked to do more work in pottery at some point, and I colored it with the metallic red-violet and turquoise of raku, like a vase I used to own before it was broken. I really indulged my imagination in this painting, and had a great time doing it.
Friday, June 2, 2017
Playing with color as energy
 |
| Floral #9 |
On this one, I wanted to work from dark to light so I didn't have to end up painting dark spaces around my flowers, and I wanted to paint as loosely as I could possibly make myself. But more than anything else, I wanted to COMPLETELY PAINT OVER Floral #1, "Blue and Orange", as I stopped liking it several months ago and took it off my Etsy site, but hated to waste a good panel. You may recognize the vase, slightly updated. One of Robert Burridge's sayings, "Don't worry about painting things that don't make sense," played in my mind several times whenever I hesitated while painting. As long as the blobs looked like they were supposed to be flowers, that was going to be good enough for me.
The background is just layered scribbling, and only one of the flowers got any detail at all, the rest are just shaded to suggest petal shapes and three-dimensionality. About halfway into it, I discovered I was making lost edges around the bouquet by going back and forth between the flowers and the background scribble-glazing, and I liked that. I had discovered on a previous unpublishable sketch that if you decide your foreground subject shape isn't quite balanced—or too balanced—you can offset that with your background shapes and colors. I had fun making the bouquet look bigger with blurry colors around the outside, extending the color range and adding more color energy to the painting. It also transitions from the semi-defined flower shapes to the completely ambiguous background. It's sort of like a halo or aura of light around the subject. A bit romantic, but fun.
ANNOUNCEMENT! I'll be at the Local Author Fair tomorrow from Noon till 3PM at the Oregon City Library, signing copies of my first book, "First Aid For Your Menopause Emotions". Thirty-five other local authors will be there with me. Come on down!

UPDATE: I've finally created a facebook page for this book, where I'll be blogging about menopause and anything related to it, including living a best-possible post-menopausal life. You can find it HERE.
Sunday, May 28, 2017
A new gorge sketch

Here's another of the sketches I worked on early this month, still playing with blue and orange. The scene is looking east from Catherine Creek State Park (again). I stripped out the trees, so the focus is on the shapes of the lands and light, and the sunrise colors.
Saturday, May 13, 2017
Orange with yellow and green
 |
| Orange Border |
I wanted to try a long floral example, and use the greens I'd been leaving out recently. I repainted the center several times, and didn't get it right till I put those dark maroon touches in the center top flowers, and added the pale yellow portulaca—or whatever it is—that's near the center. I had split the composition in two and had to pull it back together.
As I was learning to make red-oranges on Chili Drawer, I was painting them in these flowers. Technically, I was working on four different paintings, and I liked it—three of them being small made it easier—because you can use things you learn in one, in all of them, if you want to try something more than one way. It also makes it easier to keep painting and still let your paintings dry when you need to, which I need to do often.
 |
| Sunny Day Magic |
Wednesday, May 10, 2017
Playing "Why don't I like this painting?"
 |
| Chili Drawer |
When I finished the first pass, I wasn't happy. I decided the rectangles were too small and too many.
I took black charcoal and and drew a new grid, with fewer lines, giving me fewer rectangles with a wider range of sizes. I let it sit like that till the next day, all the time feeling like those charcoal lines over the colors were the most beautiful thing I'd ever painted.
But I also realized that in normal evening roomlight, I could barely make out what was in the painting. I had used so little white, wanting more intense colors, that only the yellow bits and the pale orange were visible; everything else looked like shades of dark brown. It was a values nightmare.
The next morning I looked at it and went "Ew!" I hated the lines—it seemed to be all about the lines—there were too many, too dark. In fact, I was so disappointed with the work that I had a little crisis of confidence—Why had I been so happy the day before with what was obviously awful?
So I took the colors I already had mixed and added varying amounts of white into them and repainted all the rectangles lighter—some a little, some a lot. I deliberately made all the lines except some of the ones around the edges either fade a lot or disappear. I also took advantage of the first grid to make a couple translucent overlapping shapes and some fairly small rectangles to make the design more interesting.
As soon as the lines started disappearing I realized that drawing them had been a good thing, they just weren't finished—they were just an intermediate step to a better version. The painting went from crap to promising in less than fifteen minutes once I started working on it. I realized then that I would start liking it again when it was a "good" design—one that I thought was interesting.
One more reminder to just keep painting when I do something that doesn't look good.
During this step I literally discovered red-oranges. For some reason I had really never gotten around to playing with red-oranges, and found several discernible hues I could reliably mix. That extended my palette enough to do a large number of unique rectangles without going all the way to red.
When I fixed all those problems, I noticed an as yet unnoticed grouping of rectangles that I wanted to repeat, so I found a similar grouping and re-colored it so it connected visually to the first one.
I've already used some of those red-oranges in another painting I'm in the middle of struggling with, so that was well worth the learning.
Friday, May 5, 2017
Exploring more orange "chords", with purples this time
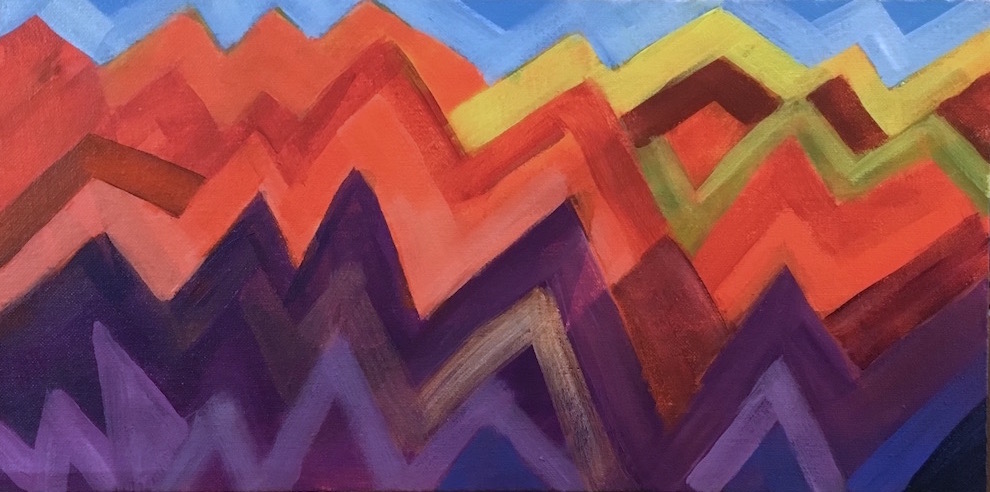 |
| Mountain Ranges |
Orange and the violet used in this sketch are two thirds of a triad. For this one I threw in some single-color accents of yellow, yellow-green, and blue, just to see how they went together. Yellow-green and blue are half of a tetrad with orange (and red-violet, missing here.) I subscribe to the idea that color combinations are completely analagous to chords in music, and that you can get a lot more interesting art when you use more complicated harmonies. Sometimes what you leave out is as important to the feeling as what you put in. But whether or not any combination actually works in a painting depends on placement in relation to the other colors, relative size, saturation, and how it supports both the subject and the idea of the painting. Only seeing and feeling it can tell you if you've hit the mark—you have to play to learn.
I think if I moved these colors around in the painting I could get several different moods, as I could if I used different values. It's a mix that carries a lot of energy and seems to beg a lot of "why?" questions, which really stimulates my imagination. Orange suggests earth and sex; violet points to spirit and the higher mind. Orange feels grounded and practical; violet leans toward infinite space and unbounded imagination.
One thing for sure—I'm never going to get tired of color.
Wednesday, April 19, 2017
Morning sun and shadows in a canyon
 |
| Canyon Shadows |
I had a background goal to try to finish this as quickly as I could as a sketch. My watercolor friend says she likes to finish in one or two hours, so I set a goal of two hours, but it took me three and a half to get it to this point, not counting a fifteen minute walk through the garden in the middle.
This one didn't put up much of a fight, but I really didn't set the bar very high—I wanted it loose and I was much more interested in figuring out the colors than in focusing on detail. This is based on the idea that if you get the right colors in the right places, it's going to look pretty much like your subject, and "pretty much" was right what I was aiming for.
I really want to do this one bigger at some point—it's one of my favorite shots from my trip—but I wasn't sure I could handle the detail. It wasn't a problem at 8x10 size, but it'll be a different story at 18x24 or bigger.
So I'll do more sketches first.
Tuesday, April 18, 2017
Blue & yellow color study sketch

After my experience with blues and yellows not wanting to work together on the daffodils, I thought I'd try a couple color sketches, just to play with them. I wanted to find a color combination that did look attractive to me.
For this first one I used another photo of Catherine Creek I wanted to try, and pthalo blue on land, ultramarine and a bit of dioxazine purple on the river, diarylide yellow in the sky, and diarylide plus primary yellow on the far hills. As soon as I added a couple tints of the blue, it looked like a late evening in winter, which was a surprise, and I was surprised to see how almost realistic the colors look.
I thought the colors looked great together here, so maybe it was the higher proportion of yellow in the daffodils.
In theory, this should have needed some red or red-orange to balance the blues, but I guess the Diarylide, a yellow-orange, adds enough balance to keep it from looking one-sided.You never know what you're going to find out when you start playing. In this case, I found an interestingly pseudo-realistic color treatment.
I spent a couple days last week exploring this same part of the Gorge with friends, and got a lot more photos to work with. I'll be quick-sketching a few of them. Don't know if I'll try any more snow scenes now; maybe in August. 😊
Saturday, April 8, 2017
Progress of skills is not linear

I never thought a two-day sketch of daffodils could be so hard to paint. It was interesting the first day, frustrating the second, really frustrating the third, and after the fourth I was ready to give up. But on the fifth it finally started looking a bit better, and today, it's okay. What took the longest was nailing down the basic colors. I've never done much work with whites except clouds. Lavender was the first tint I tried for the un-highlighted areas on the white petals, and that wasn't awful but it wasn't pretty. Then I tried gray-greens, and blues—I've always loved blues and yellow together, but not this time—before finally settling on an almost teal, which went well with both the yellows and the greens.
The other big problem was that the photo reference was strongly backlit, and I couldn't make that work in two days of trying so I gave up and faked more normal lighting. Once I got that far, it finally got to be fun. Now that I'm ready to call it done I'm thinking how I could have done it better—but that's a major point of sketching—get the first one out of the way, and stop thinking about it. Just get the experience under your belt.
But I did really get a good education in yellows and ruffled edges, and I only rarely work in yellow or orange. I invoked the artist's privilege to outline the coronas in purple; that was anti-realistic and fun. Sometimes I just want to find out what I can get away with—it's good practice drawing with the brush, and 100% approved for sketching. That's still how my mind works, unfortunately—Is this okay? Is it allowed? I sure hope I can get to a point where I can stop worrying about that. The only things that matter are how the painting looks, and what lessons did I get from this one?
Monday, April 3, 2017
A post-sketch painting of Catherine Creek
 |
| Memaloose Island |
After doing the sketches of the gorge I wanted to see if they made it any easier for me to make a painting of it, so I basically copied the image of the second one, a combination of the two photos—the basalt outcrop at Catherine Creek, and the gap just east of there. And no big surprise, it did make it a bunch easier, enough that I finished it in just over a week, working around a bit of stomach flu. It did take me a few hours' work coaxing the complex hills and bluffs into a close approximation of the way they actually look.
I'm still not very familiar with the geography there, but I think the near bluff on the right is Rowena Crest, and the more distant land on the left is around Lyle. (I added some buildings to the painting after I took this photo.)
I'm still not very familiar with the geography there, but I think the near bluff on the right is Rowena Crest, and the more distant land on the left is around Lyle. (I added some buildings to the painting after I took this photo.)
The most fun part was the foreground, playing with the big color range from the black basalt through the dried and the green grasses, to the wildflowers, blue Camas and a pink thing that looks like a clover flower that I can never remember—Rosy Plectritus. I used 3 yellows, two greens, brown, orange, white, and black just for the grasses! Fun playtime!
I wanted to make a center of interest around the right cluster of flowers to bring attention to that area, so I put some soft highlights in the trees just above them and then darkened the ground just below them, and that gave them just a little boost.
 |
| Detail |
It was nice to finish it so quickly—last year a painting like this would have taken at least 2 weeks of work and a lot more worry; I credit all the sketching & quickie exercises I've done this year for the speed improvement. I used to get into so many situations where it just seemed like there was no way out, and that doesn't seem to be happening any more. I'm getting into a habit of just trying something, anything, when I get stuck now, and once I stop worrying about the outcome, it's amazing how many times those wild-guess experiments just work.
Saturday, March 25, 2017
Looking East
 |
| Looking East |
I did more work on the foreground in this one, wanting to see more of the grasses and do more to balance the foreground and background. I also mixed a lighter color for the distant bluffs.
Friday, March 24, 2017
Sketching the Gorge with a very used brush
 |
| Rowena Plateau |
I mixed up a nice china blue from Pthalo blue and Dioxazine purple, and picked up a superbly beat-up and damaged small flat brush and started scribbling in the dark shapes. The bristles on one side are bent back 360º and they were great for scratching on trees, branches and other rough shapes, while the other side was still straight enough to sort of draw lines and put the paint on flatly. I did use a different tint on the river, a mix of Pthalo and Cobalt blue. I was going to color it in fully, but decided to stop with a value study.
I'm surprised how traditionally "sketchy" it looks, and yet how fresh and "real", as if I'd done it right there. It seems like a great example of brush-stroke texture as detail, and I'm liking how many different looks I got depending on the value and thick-or-thinness of the paint and how much time I spent on that bit. No real painter would ever throw a brush away, unless maybe the handle breaks off, and clearly this is why. What a gold mine!
Monday, March 20, 2017
A big loose-ish landscape

I was thinking I would try doing a photo-based landscape in the same brushstroke style I used on Wild Iris, but as I was painting in the sky and tree foliage, I decided to reduce the amount of texture by having fewer brushstrokes and more larger, smoother areas of color. Most of the water is pretty smoothly mottled, but I tried to delineate most everything else.
The location is the Catherine Creek State Park in WA, northeast of Hood River. It's a great wildflower area I go to with friends most years in May. As far as I know, only the elves use the stones to cross—there's a wood plank bridge for humans. It's where I took the photo from.
It was a pretty straight-forward effort, using a lot of glazing to get the myriad of greens and blues that are in here, and a guess at how many highlights to put in. They could change. This one took me a week, the longest painting I've done all year. I would personally call it "impressionistic" because it really is all about the light.
Friday, March 10, 2017
A return to loose color
 |
| Wild Iris |
From then on I just kept layering on subtle variations of hues over the whole painting. When I added the darkest greens I began to feel like I was channeling Vincent van Gogh and started really paying attention to my brushstrokes and how I was weaving the darker tones into the middle and lighter values.


When I thought it was finished this morning I started taking photos of it and immediately noticed little problems with it—mostly in places where I had unintentionally created the appearance of a straight vertical or horizontal line—just fixed two more of those. I've done about seven cycles of that and now I think I've fixed them all!
But other than than that, this has been a joy to work on. The scene is how I imagine a hillock and ditch overflowing with wild iris and other moisture-loving plants, with March-wind-blown fir trees in the background.
This year I switched from sitting down to standing while painting, and I recommend one particular item—an anti-fatigue mat to stand on. I had to trim it a tiny bit to slide it up into my easel base, but it was worth it. My palette stand is about 4-6" too short, but that's the only real problem. It took me a few days to get used to standing up for hours at a time, but I'm glad I did.

Monday, March 6, 2017
Tilting Perspectives
 |
| Tilting Perspectives |
Artistically, I felt like the big problem was to make a coherent image with patterns that might be recognizable as familiar objects, like a cityscape, and I don't think I quite got there. it was interesting working in such a limited color range.
It was extremely slow to work on and a real test of both my resolve (aka stubbornness) and trusting my hands to make something interesting. Clearly I need a lot of work on the latter. I kept wanting to make more different patterns, but when it got so chaotic I could barely look at it, I started seeing ways to simplify it. I think once I decided what it "meant", I over-emphasized that to the detriment of the visual impact.
Looking back over my work since New Year's, I get the feeling that I'm going through a phase where I have to try every style I've ever liked at all. I love colorful geometrics. If there's an opposite to "loose", this is it. I think I'd better try more abstracts. I like some things about it—the range and arrangement of values, the repeating white (formerly) verticals, even the hard edges.
I've almost talked myself into painting over parts of it, but I'll let it sit a while longer.
Friday, February 24, 2017
Finding out what you don't know
 |
| Floral 8 |
I found out I have a very incorrect image of daylily blooms in my head. I see a couple hundred daylily blooms every year in my garden, but the only way I ever looked at them was face on. No matter how much I tried to paint them from the side, I couldn't make them look real, because I had that shape completely wrong in my head. I managed to google some references online so I could finally finish it, but only after painting them all wrong a few times.
I just kept thinking, if I really understood the structure of this flower, I could paint it much more quickly with many fewer strokes, and it would look more alive.
So, this year, to become a better painter of flowers, I'm going to be cutting more flowers, bringing them inside and taking photos of them from different angles, and sketching them until I have all those shapes in my head, ready to use any time.
Tuesday, February 21, 2017
Lessons from the imagination

This was another interesting journey into the unknown. My intent was a loose floral sketch in a new color scheme with a dark background, and to start without drawing, make color blobs and see what developed. I started with mahogany—blackened red—for the dark upper background and instead of the complement of green, I chose a split complement of yellow-green and blue-green. When I went looking for other colors for accents, I added yellow-orange and a grayed blue-violet to complete the harmony.
As much as I was enjoying the way the colors played together, it chafed me that I had chosen such an unrealistic color for the flowers. There are many kinds of green flowers, but none like these. But instead of restarting I chose to stay with it and see if I could make another interesting composition out of it, as an experiment, to prove to myself that reality is not necessary to make an eye-catching painting.
In my last painting it seemed that a contrasty light-dark composition was what attracted my eye most strongly, and I wanted to test that in a different set of colors. Whenever I got stuck wondering what I wanted from this painting, I knew it would have been easier and quicker to copy an image I already had. Because I couldn't do that here, I had to let my imagination guide me. But, if you want to grow a muscle, the best way is to use it, so I chose to paint what did come out, and it was these giant mutant primulas.
The hardest part on this one was creating the light-dark pattern from my imagination—I don't seem to have any facility for that at this point, and that's one of my big motivators to do all these sketches. I went through several stages of moving the light areas around, shrinking them and growing them. When there was too much light, the painting lost its center and looked like a less interesting piece of a larger painting. I had to surround the flowers with dark in order to keep them inside the frame.
I also wanted to play with outlining, as that seemed another way to draw attention to particular elements of a painting, to be a substitute for detail. I can tell that it definitely works for that, just as shadows do. But here, it was really too much until I strengthened the lines on all the stems, and outlined the orange flowers in a less dramatic color.
This is why I'm sketching—to learn all these lessons. Now I have more ideas to play with as I'm working out my next compositions.
Friday, February 17, 2017
No more detail than necessary
 |
| Dainty California |
I had to rearrange them on the paper though, to make a nice composition for 8x10, and I was feeling the need to draw it first so I moved the flowers around in relation to each other and took some liberties with the leaves, besides inventing the round vase. For colors, I figured red, green, and blue, and made the top a blue-black with the same cobalt on the table. I started out with a pink vase but in the end added just enough yellow to make it more coral; the golden yellow stamens add a nice balance for the blues. I have a tiny glass frog I added, in a sort of homage to our local tree frogs.
I had fully intended to make another loose, impressionist-like sketch, but once again, what I was planning simply did not happen. After I blocked in the colors over my charcoal drawing, which was more precise than I expected because I needed the drawing practice, I felt like I was being pulled back to the super-careful brushstrokes and slow, tedious painting I'm so tired of. I stopped working on it for a few hours until I could shift my mindset to be, okay, you have exactly the composition you wanted, now just start slopping on the paint, like you've been doing in the other sketches. That seemed to break the spell and I was able to pick up a brush and just relax and put the colors on where I thought they should go. It was easier than I thought. I did try to make mindful strokes, but fairly loose ones, and not worry about whether they came out right, knowing I could always paint over them. The work went quickly and I was able to get it almost complete within a few hours, and yet it looks like I spent a lot more time on it than I did. The colors were simple, and the backgrounds too, and that helped. So it wasn't tedious, it was relaxed and fun, and I actually enjoyed doing the few bits of detail.
I love the dark background, and having that seemed to make it easier for me to put in natural-looking shadows. I did touchups on it for another couple hours this morning. Except for the stamens and the frog's toes, there's almost no detail, and I like that about it. So I think it still qualifies as a sketch since it took just over one day. I could probably spend a lot more time on the patterns on the petals, but it looks like camellias, and that was the main thing I wanted. I wouldn't want to have to put the sawtooth edges on the leaves, but that's probably what I would have tried to do last year. Enough is enough.
Tuesday, February 14, 2017
Get your scribble on
 |
| Floral 6 |
While I was working up the background, I rediscovered the joy of scribbling. Some people are doodlers, but I was never a doodler, I was always a scribbler. Sometimes I think I'd be perfectly happy just piling one layer of color over another, completely covering the one before, just scribbling with the brush, but I've never believed that that would actually produce anything one would call Art. Maybe I'll try it someday, but in the meantime, I did find it very satisfying to abandon all discipline and just scribble the background in.
When I started painting the flower blobs, I still couldn't stop myself from painting a big round bundle that looked heavy and solid, and had no air in it at all. So I left it to dry and came back later with the light blue background and painted out about a third of the flowers, and that improved it greatly. But I didn't like the pale yellow and peach in the background and table so I darkened them to where they are now and worked up the vase. When I stopped at that point last night, it was clearly the best floral I'd done so far, but it still looked like it had a little headache or ate too much the night before—just a little off color.
I didn't figure out what the problem was till I'd looked at it on the computer. I had used a pthalo blue in the top background, and cobalt on the flowers. I decided to try switching the pthalo to a cobalt wash, and bingo! That was the problem. I've combined those two colors in a lot of paintings and they've worked well together, but they really didn't in this mix, at least not the way I was using them. I also darkened the tone of the top blue, which popped out the flowers more.
Saturday, February 11, 2017
From color blobs to abstract
 |
| Landscape |
I also thought it reminded me of an aerial view of a complex of buildings in a green landscape. Today I decided I just wanted to clean up the edges, overlaying lighter or darker colors to please myself. I drew the few lines to support the idea of structures, and to draw the eye toward that left yellowish block. I'm trying to remember to only put detail around the intended center of interest.
At last—an abstract sketch! From color blobs! With a design I like, which was my goal.
Subscribe to:
Posts (Atom)